
BagaPie
Modifier and Assets : Documentation
What is BagaPie ?
BagaPie Modifier is an all in one and free addon.
It creates presets for scattering, hard surface, deformation, architecture, array random, groups, ...
It is accompanied by the paying extension BagaPie Assets which is fully integrated into BagaPie's workflow (Blender 3.0 to 3.6 ).
BagaPie V10 is available for B3.4. and B3.6
How it works ?
Select an object then press J. You can then choose a modifier in the pie menu (scatter, boolean, displace, ...).
The BagaPie panel (in the addons panel), display the modifiers present on the selected object.
You can control the modifier visibility, apply or remove them. The various properties of the selected modifier appear below.
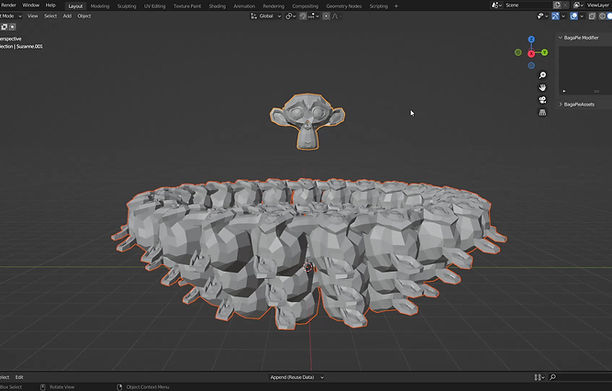
Scattering

Scatter
Scatter Paint
Creation : Keep pressing Shift key and select one or multiple object(s) to scatter, select the target (surface) on which you want to scatter object(s), then press J > Scatter or Scatter paint.
Access : Pie menu (J key) and N panel (addon panel).
Notes :
_ You can add as many assets layers as you want.
_ Warning ! Due to recent redevelopment of the Scatter Tool, scatters created by the current version aren't compatible with the previous ones and vice versa.
_This tools works with the Asset Brower integration function


Default Scatter modifier :
Modifier List : Display every BagaPie modifier present on the selected object.
Rename Layer : Allow you to rename the current scatter layer
View Display : Display only X% of the instances (only viewport).
Assets : Add or remove the selected asset to the selected layer. You have to select assets then add the object to the selection or Asset brower.
Proxy : Enable/disable proxy on every assets in the active layer.
Paint : Switch to paint mode to add/remove instances. If necessary, SUBDIVIDE YOUR SURFACE : please note that Scatter paint basically require subdivided surfaces.
Pos/Rot/Scale : Allow you to rotate, move or scale your instances.
Tip : You can use driver to synchronise texture between layer :
Random : Allow you to randomize the position, rotation and scale.
First row : minimum on X, Y and Z axis.
Second row : maximum on X, Y and Z axis.
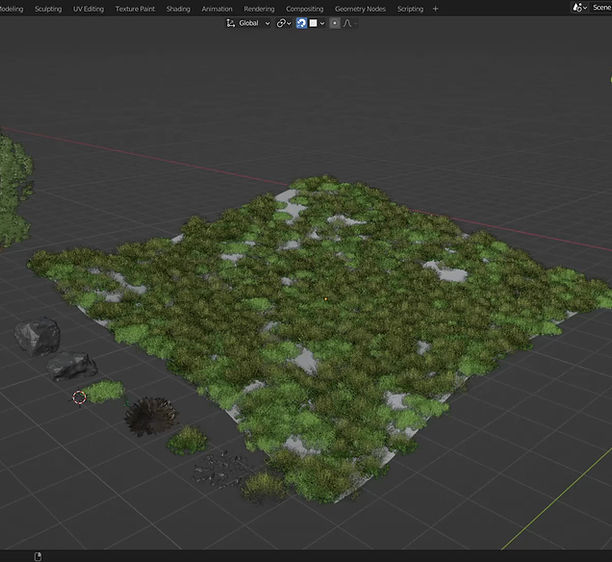
Point Effector
For scattering
Creation : Keep pressing Shift key and select one object (thus designated as the effector), select the target (surface) and the related scatter layer in N panel, then press J > Point Effector.
Access : Pie menu (J key) and N panel (addon panel)
Note : If necessary, subdivide your surface to increase precision.
Default Point effector modifier :
Modifier List : Display every BagaPie modifier related to the selected object. At least one scatter layer is necessary.
Distance : Distance between object's surface and the instances.
Keep min and max close for sharper results.
Density : Instances density in the affected area. Switch from 0 to 1 to affect proportionally your scattered objects onto the surface.

Windows
Creation : Select Wall or another object, then press J > Windows.
Access : Pie menu (J key) and N panel (addon panel).
Notes :
_ In order to facilitate the utilization of the tool, don't forget to activate the Snap to faces basic feature : the volume you draw must have the same thickness as the wall to function properly.
_ Windows tools only fonctions on flat faces, and can't be properly applied to spheres or curved walls.
Default Windows modifier :

Modifier List : Display every BagaPie modifier related to the selected object.
Window Size/Offset/Bevel : Allow to edit window joineries
Merge by distance : has to be superior or equal to the wall thickness, otherwise the creation of the window can fail.
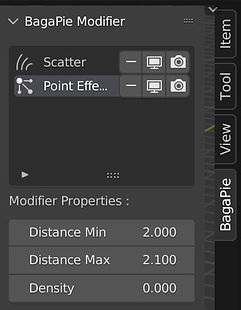
Handrail And Fence Generator
Creation : Press J > Handrail, then draw path of the railing.
Access : Pie menu (J key) and N panel (addon panel)
Note :
_This tool uses a 2D curve. That is to say, it will always remain flat. To move it on the Z axis, you have to go into object mode and move the whole object. If you select a curve, the railing will follow the curve, otherwise you can draw them from scratch.
_The Fence generator tool is only available for BagaPie 8.0.
Default Handrail modifier :
Modifier List : Display every BagaPie modifier related to the selected object.
Curve / Poly : Poly creates straight pipes between the points and the second follows the curve.


Architectural Presets
For scattering
Creation : Press J > Column, Beams, Stairs or Floor and also Tiles (For BagaPie 8.0 only)
Access : Pie menu (J key) and N panel (addon panel)
Note : The Tiles generator tool is only available for BagaPie 8.0.
Default Spiral stairs modifier :

Modifier List : Display every BagaPie modifier related to the selected object.
Boolean
Creation : Select object, then press J > Difference (for material soustraction) or Union (for material addition), then draw your boolean.
Access : Pie menu (J key) and N panel (addon panel)
Notes :
_ By default, it uses Exact mode. If you have slowdowns switch to Fast mode.
_ The Boolean uses the Add Object tool, you can change the shape. If you do not use the exit button, it may remain active when you return to Edit Mode.
_ The mirror setting uses the object's origin by default.
_ If you use this modifier on meshes that contains Array or Scatter, hide them first and switch Boolean to Fast mode.
Default Boolean modifier :

Modifier List : Display every BagaPie modifier related to the selected object.
Utilization : When drawing a shape, press Ctrl to activate snapping or Alt to extrude from the center of the volume
Proxy
Creation : Select object, then press J > Proxy
Access : Pie menu (J key) and N panel (addon panel)
New : ( for Bagapie 9 only )
_To activate several proxies at once select your objects > press J > Proxy
_To disable multiple proxies at once Select your objects > Press J > Proxy > select ''disable proxy on selected object'' > OK
Default Proxy modifier :

Modifier List : Display every BagaPie modifier related to the selected object.
Save Assets/Material
Creation : First, create a new Library, in Edit > Preferences > File Paths > Asset Libraries > Add Asset Libraries > Save preferences.
Select object(s) and press J > Save Asset or Save Material > Select your library. Then, switch to Asset Browser Edit Type to visualise your saved asset(s) and refresh the Asset library. Your asset appear and you can now drag and drop the object on 3D Viewport Edit type.
Access : Pie menu (J key) and N panel (addon panel)
Notes :
_Once you've saved your asset, don't forget to refresh the Asset Library (shortcut R).
_ If the object is modified and it is save as asset again, an option detects the existing version and proposes to create a variant (by renaming the asset). You can also decide to replace the existing asset with the new one.
_ If you open a new blender, the assets will be directly available.


Use your local library. Eg : "New Library"

Group_ Duplicate by Alt + N

Group_ Instances
Group
Creation : Keep pressing Shift key , select objects and press J > Group.
Access : Pie menu (J key) and N panel (addon panel)
Notes :
_ Select the group by clicking on the origin or on an edge of the bounding box. if the bounding box is deleted, objects must be frozen, so enable the Selectable thumbnail (yellow box on the screenshot bellow) in the layer panel by activate it in Filter (red box bellow).
_ If the selected objects have a parent, the parent must be selected for them to be taken into account.
_ Once the group has been created, the group's objects is no longer selectable, use Edit Group to make it selectable again.
Utilization :
_ Once your group is created, you can Lock it to make it unselectable, or Edit it to modify the position and the geometry of each one of the objects of the group.
_ Use Alt + J to basically duplicate the group by creating an independant group ; both of the original and the copy are therefore not affected by any modifications of their alter ego.
_ Use Alt + N to duplicate the group by creating a linked group ; thus note the original and the copy are only impacted by the modification of the geometry of the components of the linked group. They aren't affected by any translations (rotation, scale or move) of objects within the linked group.
_ Convert your group into multiple instances by selecting the group, then click Instances in Bagapie panel. The original group appears at the origin of the 3D viewport, then duplicate and spread the instances. To modify instances, use Edit mode in the original group, as you can modify both geometry and translation of the objects of the group. This is the most optimized method to duplicate identical objects in wide quantities without overloading your computer., as only one group is physically modelised : as instances only are projections of the original group.
Activate Selectable in layer panel to enable selection of unselectable objects

Default Group modifier :

Modifier List : Display every BagaPie modifier related to the selected object.
Utilization : Edit, delete or change the group to an instance. You can duplicate the group by selecting its bounding box and pressing Alt + J (or Alt + N for duplicate linked).

Camera Culling
For scattering
Creation : Keep pressing Shift key and select one camera or empty, select the target (surface) and the related scatter layer in N panel, then press J > CamCulling.
Access : Pie menu (J key) and N panel (addon panel)
Notes :
_ Once this modifier is added, a button will appear in each scatter layer to enable/disable Camera Culling.
_ If necessary, subdivide your surface to increase precision.
_ You can't cumulate more than one Camera culling modifier.
Default Camera culling modifier :

Modifier List : Display every BagaPie modifier related to the selected object. At least one scatter layer is necessary.
Ratio : Allow to adapt the camera focal lenght on X and Y axis, from near to far.
Offset : Instances density at the edges of the affected area.
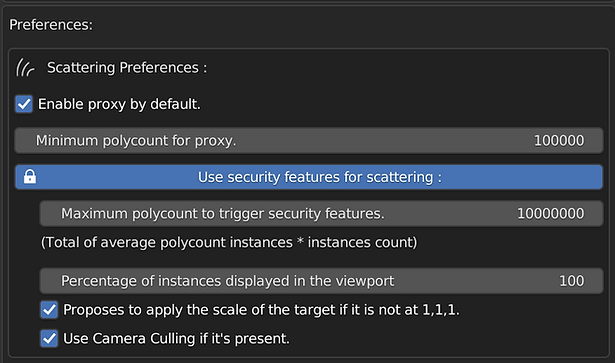
Security Features
For scattering
This feature avoids overloading your computer.
Access : BagaPie Modifier in Edit > Preferences > Addons > BagaPie
Note :
_ Don't forget to save your preferences !
BagaPie Modifier addon preferences > Security features :


Snap Asset
Creation : Keep pressing Shift key and select one or multiple object(s), select the target (surface), then press J > Snap Asset.
Utilization : On the N panel, click on Add Instances, then click onto the surface to add instances. Instances are added only on top of objects.
Press Escape to stop clicking.
Access : Pie menu (J key) and N panel (addon panel).
Notes :
- This tool ignores snapping on instances (incompatible with Array).
- This tool add new vertices, you can switch to edit mode and manually edit the instances position. For a better visualisation, display the initial scatter layer and activate Toggle X-ray (shortcut : Alt Z).
- If you are using a version prior to Bagapie 9, this function is called Point Snap Instance.
- This tool works with Asset Brower integration function.
Default Snap Instance modifier :

Modifier List : Display modifier related to the selected object.
Add Instances : Allow you to add new instances on the affected surface.
Source data : Object and collection used.
Offset : Move instance on Z axis, from its initial position.
Random : Randomize rotation and scale
Ivy Generator
Creation : Select one or multiple target(s), set 3D Cursor and press J > Ivy
Utilization : In the N-panel (addon panel), you can apply, remove or change the visibility of the modifier, modify its parameters, add new ivy and add/remove target.
Access : Pie menu (J key) and N panel (addon panel)
Notes :
_ If you add an ivy from the Pie menu, a new ivy system is generated with new settings. If you use the N panel, you generate an extension of the existing one with the same parameters.
_ This generator creates a cylinder around the empty, then project this cylinder to generate ivy. Radius and height both match to the cylinder.
New : (For BagaPie 8.0 only) :
_A new projection mode on grid is available > N panel option Grid Projection
_The visuablisation of views guides > N panel button View Guide
_From now on it is possible to apply the modifier Ivy Generator.

Default Ivy generator modifier :

Modifier List : Display modifier related to the selected object.
Target : Assign/remove a target from the Ivy system : from the initial Ivy layer, keep pressing Shift key, select the new target and select the Ivy. Then press + Target to include the target, or - Target to exclude the target.
Add a new ivy source : A new sphere (empty) with an ivy linked will appear. Move the Ivy empty to vary the arrangement of the ivy, or click on Add Ivy to 3D cursor to add multiple Ivy empties by setting de 3D Cursor.
Source data : Object and collection used.

Pipe and Cable Generator
Creation : Select target(s) (mesh for pipes snapping) and press J > Pipes or Cable.
Utilization : This tool switch automatically in edit mode and use the draw curve tool. If you want to add more pipes, select it and switch to edit mode.
Access : Pie menu (J key) and N panel (addon panel).
Note :
_You can easily edit the pipe in edit mode : You can edit each pipe by selecting the vertices of the affiliated curve.
_The cable generator tool is only available for BagaPie 8.0.
Default Pipe generator modifier :

Modifier List : Display modifier related to the selected object.
Poly/Curve : Determine the main shape of the curve. You're free to switch from an polygonal to a curvilinear disposition.
Custom objects : Different extra part of the pipe.
Precision : The most important setting ! The pipe is fundamentaly generated from a curve and the position of each point on the curve is rounded. This setting determine the accuracy degree of the pipe
Jonctions et support : Dimensions of extra parts of the pipe.
Tip : Take a look to the "apply scatter" video.
UVs are stored as an attribute in geometry nodes. Once the modifier is applied, you can convert this attribute to UVs data.
Materials : You can assign materials on any part of the pipes in the modifier stack (the place you add modifiers in the object property)
Custom objects : Enable this button then set the source object/profile in the modifier stack (the place you add modifier in the object property)
Wall and Brick Wall
Creation : Select a flat surface (2D shapes like plane, circle, or line) or a curve and press J > Wall or Brick Wall
Access : Pie menu (J key) and N panel (addon panel)
Note :
_ Wall tools are generated from edges : even if you can apply it to spheres or cubes, it could generate uncontrolled results : this modification changes edges into walls so use appropriate meshes.
_ Please note Wall tool can't apply to curve, while Brick Wall tool can.
Default Brick Wall modifier :

Modifier List : Display every BagaPie modifier related to the selected object.
Height/Thickness : Allow to edit wall or brick specifications.
Axis offset : Random disposition along the axis

Array
Creation : Select object, then press J > Array, choose the type of array : Line, Grid, Circle, Curve or Curve deform
Access : Pie menu (J key) and N panel (addon panel)
Note :
_ BagaPie Assets unlock an additionnal tool : Draw Array Assets, which is a shortcut to randomly arrange BagaPie vegetal and mineral assets by drawing a curve.
_ Don't apply your Array from Blender modifier panel otherwise it will not operate ; apply it only from Bapapie panel.
_For Array Line grid and circle selctioner the objecst to repet> press J > Array.
_For the Array curve and curve deform select first the objects to copy and then the reference curve > press J > Array.
_Curve deform works the same way as the array on curve but deforms the object to match the curve.
Default Circle Array modifier :
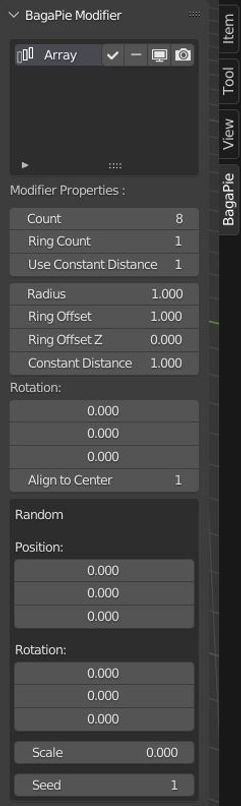
Modifier List : Display every BagaPie modifier related to the selected object.
Displacement
Creation : Select object, then press J > Displace, then select the type of texture you need in the N-panel
Access : Pie menu (J key) and N panel (addon panel)
Note :
_ Depending on the type of texture used, some parameters (scale, brightness, and ramp) may not be available.
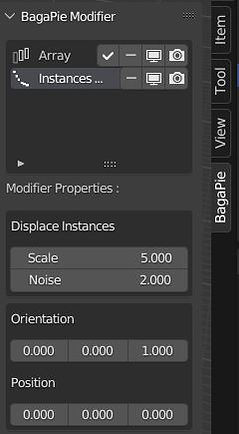
Default Displacement modifier :

Modifier List : Display every BagaPie modifier related to the selected object.
Instance Displacement
Creation : Select object, it must have instances (Arrayed or Scattered objects only) then press J > Instances Displace
Access : Pie menu (J key) and N panel (addon panel)
Note :
_ You can't convert it to mesh.
Default Instance Displacement modifier :
Modifier List : Display every BagaPie modifier related to the selected object.


Siding
Creation : Select object, press J > Siding
Access : Pie menu (J key) and N panel (addon panel)
Note :
_ It is possible to have two projection axes at the same time.
_ Warning, if your face is perpendicular to your projection axis nothing will appear.
Axis button : Choose on which axis the siding will be projected.
Default Siding modifier :

Modifier List : Display every BagaPie modifier related to the selected object.
Node to Panel
Creation : Select object, open geometrie node panel > New
Access : N panel (addon panel), modifier stack and geometry et shader nodes editor
Utilization :
_ Node to Panel allow you to create your own panel to control complex node trees.
_Once your geometry node is created, go to modifier stack and rename the modifier title and add BP_ as prefix. This prefix informs Bagapie to display your node tree.
_Then in the node editor > Npanel > group you can set prefixes in your inputs names. Exemple : "V" followed by an underscore "_" will display the inputs as value (Float, Bool, Vector, Integer, Object, String, ... ).
_Then to create box add "B" as prefix followed by an underscore "_", then add your final previx. Exemple : "B_V_MyValue" will create a box with "MyValue" displayed.
For each new inputs, you simply have to add B as first prefix, they will be assigned to the current box (exemple : "BV_MyOtherValue"). If you want to create new box, add "B" with an underscore "_". In this case, the underscore mean "new". It's the same way it works for Row.
_ In some cases, you may have to create unnecessary inputs to create buttons, labels ("titles") and empty spaces (Separator).
_To create a button press add "P_" as prefix. Be careful to set the type input as boolean otherwise nothing will appear. If you add a number to the prefix (ex :P3_) you will be able to associate inputs visibility with the button, this number will be used as identifier. This will allow you to hide or show the associated inputs and therefore create a menu. To associate an input to a switch you just have to add the identifier as first prefix.
Exemple : "3V_Value" mean "If button with 3 as identifier is enabled, display "Value"
_To control the Height of an input in the Npanel you just have to add an integer.
Exemple : "V_2_Value" mean "Display value with scale of 2"
_It is possible to space two values, for that add a prefix S_ followed by nb_ to space the two values.
Exemple : "S_4" will add a size 4 separation.
_You can create a link to a web page with the "URL_" prefix. You have to set the input type as string and paste your link as default value.
ear.
Note :
_The Custom menu works for both geometrynode and shader editor. But for the Shader editor it is necessary to rename a node group with the prefix BP to be detected. To rename the title of the node tree you have to go to npanel > node > name. To edit the inputs, you must enter the node group and then proceed in the same way as for geometry nodes.
_Each switch / input association must be between 0 and 9, so it is not possible to associate more than 10 different buttons.
_Buttons with identifier must be outsides boxe/row. A button in a box can't control inputs.
_You can't create a box within a box.
_It is not possible to create a row in a row.
_Of course you can resell your own nodetree using the Bagapie Node to Panel system. BagaPie Modifier is free and will remain free.
_For Bagapie V10 only, You can now display float curve, or color ramp in the Npanel thanks to the Prefix C_Name. It is necessary that the name or the label of a node is identical to the name which is the Prefix C_

Cupcake by Sanctus - Blender demo files
Rename the nodegroup title starting with BP_ for geometrynode editor

Rename the nodegroup title starting with BP_ for shader editor

Geometrie Node > NPanel > Group

Node to Panel : You can choose the values to be displayed, their title, their location and also add subtitles to them.

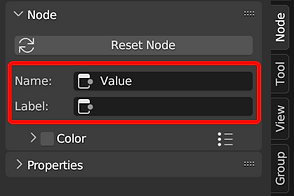
Shader Editor > NPanel > Group
Prefix :
V_ : Display value
L_ : Display label
B : Display box.
R : Display value column
B_ : Create a new box.
R_ : Create a new column
S_nb_ : separates two inputs
nb_ : Height of input (hauteur)
URL_ : Create a link to a web site
P_ : Display a Press button
Pnb_ : Associates a switch with inputs
nb : Associates inputs to a swicth
C_Name : Display Float Curve or Color Ramp
3D View > NPanel > BagaPie :

Geometrie Node > NPanel > Group

Geometrie Node > NPanel > Node
New for Bagapie V10 : New for Bagapie V10 : You can now display float curve, or color ramp in the Npanel thanks to the Prefix C_Name. It is necessary that the name or the label of a node is identical to the name which is the Prefix C_
3D View > NPanel > BagaPie :

Draw asset
Creation : Select object, then press J > Draw
Access : Pie menu (J key) and N panel (addon panel)
Note :
_If you are using a version prior to Bagapie 9, this function is called Draw array asset.
_This tool works with the Asset Brower integration function
_You can select one or more different assets to draw.
Lenght / Count : Choose the mode of distribution of the assets by length or by fixed number.
Rotation : Allows you to adjust the position, orientation and scale of the assets.
Random : Adds random rotation and positioning of assets along the curve
Default Draw asset panel :

Asset brower integration
Creation : Open asset brower > select assets > Press J > use the Asset Brower tile associated to the chosen function.
Access : Pie menu (J key) and Asset brower
Utilization :
_Allows you to use the assets in your asset browser directly without having to import them into the scene.
Note :
_The asset brower integration works with the Scatterring, draw arret asset, Snap Asset.
_The asset browers integration works with Bagapie asset but also with your own asset. _This new feature is only available in Bagapie 9.0.
Define a location :

Install a package :

Geopack User
What is Geopack:
_ Geopack is a geometry node and asset brower management tool that works as an addon. Geopack allows to manage Nodegroups from the Npanel, and to use them thanks to an interface similar to Bagapie Modifier.
Installation:
_ First of all it is necessary to install Bagapie Modifier, for this refer to the documentation.
_ Select the folder where you want to store the geometry data node Edit > preference > Bagapie Modifier > Geopack > click on set pack location and select folder.
Install a Package:
_ To install a pack Edit > preference > Bagapie Modifier > Geopack > Install > Select a file of type name.geopack
Use:
_ Press V and select a pack and then a particular modifier.
_ It is possible to modify this shortcut in Edit > Preference > Bagapie Modifier > Preferences > Geopack
Install an asset bundle:
_ First create a .blend file containing the assets, select the assets > F3 > Mark as asset. Then Edit > preference > Bagapie Modifier > Geopack > select a pack > asset > Create pack > Add blend file to Pack's Asset Library, Resfresh your Asset Brower, normally the pack appears with the same name as the pack.
Storage:
_ If you want to move a pack to the pack storage folder you can use Edit > Preference > Bagapie Modifier > Geopack > Storage > Move all packs to new location.
Note:
_ Geopack do work with the shader editor.
_ Geopack allows you to create custom actions, therefore it is possible that a modifier cannot be applied to an object if the object in question is not of the right type (mesh, curve etc). For this please refer to the technical documentation of the creator. If you use a lot of packs the interface can become difficult to read, for that it is possible to manage the display of the packs with the visibility eye or to delete the pack.
Menu Geopack :

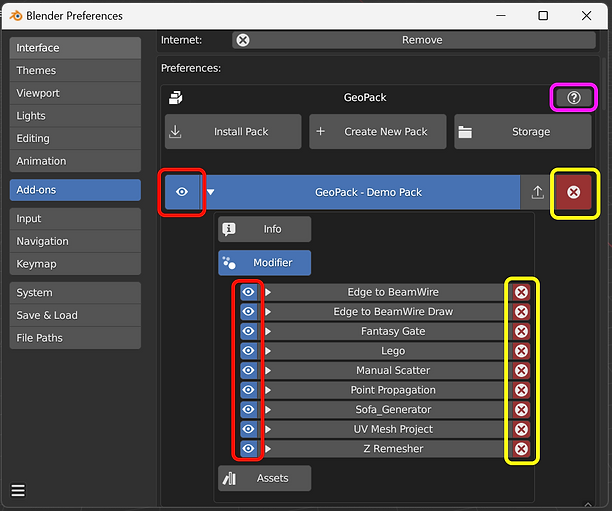
Cyan : Allows you to manage and move the file storage location.
Green : Displays pack information, such as author, description, version etc.
Magenta : Displays help and tips.
Yellow : Allows you to delete a modifier or pack.
Red : Allows you to hide a pack or a modifer in the PieMenu.
Blue : Allows you to export your pack in .Geopack file for sharing or marketing.
Geopack Creator
What interest for the Creators:
_ Geopack allows creators to create custom actions for each modifier.
_ Geopack is also a tool that allows designers to create interfaces in the Npanel for their nodetrees in a very simple way without having to resort to code.
_ Geopack is a free tool to share or market your creations.
_ Geopack is simply a support for your nodetree, your creation remains your entire property, and you are free to share or sell them.
Create New Pack:
_To create a new modifier pack Edit > Bagapie Modifier > Geopack > Create New Pack > select information > Create!
_To add a Nodetree to your pack, select a Nodetree in the modifierStack > press j > New geo pack modifier.
Export a Pack:
_ To export a pack, go to Edit > Preferences > Bagapie Modifier > Geopack > select the pack to export > press the export button (arrow).
Note:
_ Please remember to set the usage of your modification properly; otherwise, it may not be applied correctly to the object you want.
_ Attention: the type of license is purely indicative to facilitate the installation of a license of your by. It is necessary that you create a text file "LICENSE" when you share your creation.
_ When you click on the mouse on the type of license, information will appear to help you choose the most suitable type for your use.
_ Be careful: in the case of a multiple selection, only the collections are managed (the object info does not work).
_ As a creator, it is better to make a technical notice about the functioning of your addons so that users can easily use them.

Info when creating a modifier :
Modifier version : Displays the version of your modifier.
Modifier name : Name displayed in the Piemenue
Modifier version : Displays the version of your modifier
Minimal blender version : Displays the version of blender supported
Contact : Your mail or discord
Modifier version : Displays the version of your modifier
Add Hair Curves : Activate the hair curves mode of blender when adding the modifier.
Allows to set the default value of the brush.
Add Hair Curves : Activate the hair curves mode of blender when adding the modifier.
Allows you to set the default values of the brush, it is necessary to set them according to the use you want to make of your mod.
Switch to Weight Paint : Activates the Weight mode when adding the modifier.
Vertex Groupe Name/Value : Name of the new group vertex and the name of the Input in the nodeTree.
To work it is necessary that the input is of type Float or Field.
Collection Name / Inp : Name of the created collection and the name of the collection's imput
Only collections are managed by Geopack
Use selection works whatever the type of active object Mesh Curve or Other

If the modifier is applied to a mesh :
If the modifier is applied to a mesh :
If the modifier requires more than one object:
If the modifier is applied on a curve :
If the modifier is applied on a mesh or a curve :
If the modifier create a new object:
Use Selection : If the modifier needs more object for function
Selected Objects Must Be : Select the type of object used by the modifier
Active Object Must Be : If the modifier is applied on a curve
Active Object Must Be : Selection of the type of object to create (Mesh or curve).
Switch : Allows to switch to edit mode and to open the cube tool when adding the modifier.
Active Object Must Be : If the modifier is applied indiferently on a mesh or a curve
New Type Object : Allows to switch to edit mode and to open the cube tool when adding the modifier.
Active Object Must Be : If the modifier is applied to a Mesh.
Add to pack : Select the pack to which the modification will be added

Bagapie Assets
Bagapie Assets is an asset library for architecture and environment containing over 600 assets and parametric preset. Bagapie Asset is also available in a Lite version with 200 assets and a Essecial version with 20 assets.
Thanks for reading the documentation ! Here is a "secret" code to get BagaPie Assets with 20$ discount : bagapiedoc
Install Bagapie Pack
Instalation :
_ To install a Bagapie Asset pack, start by defining a location on your computer. Go to Edit > Preferences > Bagapie Modifier > Assets > Move Library to New Location
_To install an Asset pack, go to Edit > Preferences > Bagapie Modifier > Assets > Install Bagapie Assets Pack and select a .baga file.
_Go to the assets brower, refresh, the pack appears with the name BagaPie Assets.
Note :
_ The installation of a pack may take some time. If your computer does not load immediately, it is not a bug.
_ Once installed, the icon in front of the installed volume turns green.
_ In the case of uninstallation/reinstallation of Bagapie Modifier, the files containing the packs will be erased. To avoid having to reinstall the packs every time, remember to change the location of the packs before uninstalling Bagapie.

Firstly : Move library to new location
Secondly : Install Bagapie Assets Pack