
Baga Ivy Generator
Documentation
What is Baga Ivy Generator ?
Baga Ivy Generator is an addon dedicated to ivy generation (ivy, vine, climbing or creeping plants).
The addon includes about 70 different spaces with more than 300 different flower and leaf assets.
Ivy generator is available for B3.3 to B3.6 Only.
How it works ?
Select assets and then select an object and Choose a propagation mode. You can then generate an ivy from the Npannel.
The Baga Ivy Generator panel allows you to adjust the parameters of each plant to perfectly fit your environment. The addon also includes presets for each plant species.
Instalation
Addon management panel :

Installation : Baga Ivy Generator installs like any other addon
Edit > Preference > addons > installation then restart Blender
Access : Edit > Preference > addon
Notes :
_ Warning ! When you install the addon remember to install also the associated asset pack : Edit > Preference > addons > Baga Ivy Generator > Asset Browser > Install BagaIvy's asset then restart Blender.
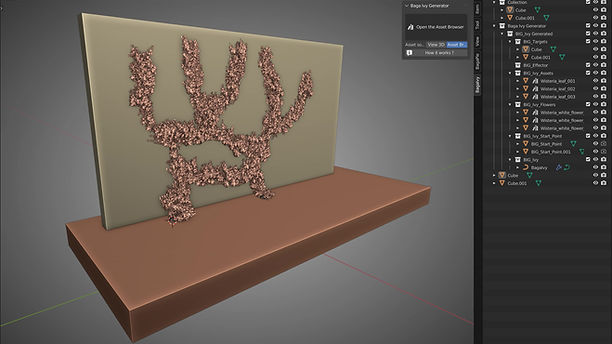
Create New Ivy
Utilization : You can create an ivy in two different ways ;
_ From the 3D View : Selecting a generation mode, select your asset in the 3D View then add to the selection the target on which the ivy will be developed, select asset sources > 3D View and click on + Add New Ivy.
_ From Asset Brower : Selecting a generation mode, open Asset Brower, select assets or a preset of your choice, select asset source > Asset Brower and click on + Add New Ivy.
Drawing : Once the ivy is created an iconosphere appears and Blender switches to Edit mode, you can draw the main branches with the draw tool.
Access : N panel (addon panel)
Note :
_ Warning ! The order of selection is important when you want to use assets from the 3D View, the target must be the active object.
_ When you go through the Asset Browser privilege presets these are already correctly set up and contain leaf and flower.
_ Please note that the generation modes work differently and have different uses:
- Fast: for generating ivy over large areas
- Accurate: to generate ivy on small surfaces
- Precision: allows you to draw branch by branch, for precise use in the foreground.
_ Warning ! It is possible to change mode after generating an ivy. However, switching from one mode to another may slow down your computer, as it will be necessary to re-generate the ivy.
_ Each generation mode has its own options and others common to all generation modes.
_ Warning ! If you're using the preset import system via asset browers, make sure that the selected collection is BagaIvy Generator and not All.
Baga Ivy Generator panel :

First
Select Generation Mode : choose the generation method according to the size of your ivy
Secondly
Select source : Choose the source of the assets to use
Baga Ivy Generator panel :

Thirdly
Add new Ivy : Once the assets and the target are selected click on + Add New Ivy

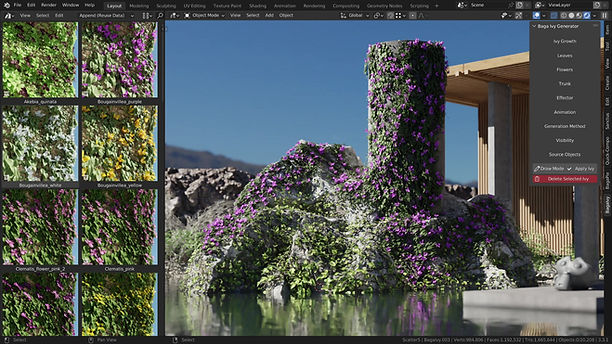
Create New Ivy from Asset Brower
Tool Tips : If you don't know what a tool is for, click on this icon, a window will appear containing an explanatory text accompanied by an image and/or a link to a video tutorial.

Ivy Growth

Add new Start Point
Effect : The Ivy growth menu allows you to set the growth parameters of the trunk and branches of the ivy.
Access : N panel (addon panel)
Notes :
_ Warning ! As for adding an asset the order of selection is important, when you want to add or remove a target, the ivy must always be the active object.
_ Adding a new starting point is done on the 3D Cursor, remember to position your
3D Cursor before adding a new starting point.
_ Warning ! The growth of the ivy depends on the normal of the face of the target objects, if your ivy does not appear on the right side think to check the orientation of the faces of your object.
_ The offcet surface option allows you to lightly lift an ivy from a surface, but if the ivy is too far from the surface, the ivy will not be able to be generated and will disappear.
_ This menu is only available in Accurate and Fast mode

Add New Target
Ivy Growth Accurate mode :

Ivy growth : Allows to reduce or increase the length of the segments which compose the trunk and the branches.
Ivy resolution : Controls the resolution of the trunk in the viewport and in the rendering.
Target : Allows to add or remove target object where ivy can grow.
Add Start Point : To add a new point of depas to the ivy.
Surface Offcet : Create an offset between the wall and the ivy.
Precision : Allows you to set the point at which the branches follow the geometry, especially near the edges of the target object.
Network Density : Regulates the density of the branch network by increasing the possibility of intersection of each branch.
Ivy Growth Fast mode :

Ivy density : Ivy density
Ivy propagation : Propagation of the ivy in relation to the layout
Angle Target Edge : Embraces the shape of the geometry on which the ivy unfurls
Ivy Bridge : ivy bridge adjustment
Target : Allows to add or remove target object where ivy can grow.
Ivy Island
Effect : In order to generate a large quantity of ivy, without slowing down the computer, an island is generated and instantiated around the trace. Island parameters can be modified in the menu of the same name.
Access : N panel (addon panel)
Note :
_ This menu is only available in Fast mode
Ivy Island Fast mode :

Display Ivy Island : Displays only original island
Branch : Allows to suppress the leaves too close to each other in order to limit the density of the foliage, especially near the intersection of the branches.
Wavy Growth : Gives a random minimum and maximum scale to the selected assets.
Branch Detachment : Allows you to add or delete assets.
Branch Radius : Defines maximum and minimum trunk and branch radius

Ivy Island
Leaves
Effect : The Leaves menu allows you to set parameters related to the leaves such as density, orentation or scale. The Add and Remove leaf menu also allows you to choose which assets to add or remove. To do this you have to proceed as for the creation of an ivy, select the source > select an asset to add > select the ivy > + Add Leaf.
You have to proceed in the same way to remove an asset unless it is imported from the Asset Brower, in which case you have to select the instance at the world origin created when importing the assets and then select the ivy > - Remove Leaf.
Access : N panel (addon panel)
Note :
_ Warning ! The random scale and orientation is the same for all assets, you have to think about orienting and sizing your sheet assets accordingly.
_ Warning ! If you import assets from the Asset Brower an instance will appear at the origin of the world, remember to raise your scene.
_This menu is different from one mode to another
Leaves Parameters
Leaves Fast and Accurate mode :

Leaves Density : Regulates the density of the foliage.
Distance Min : Allows to suppress the leaves too close to each other in order to limit the density of the foliage, especially near the intersection of the branches.
Leaves Random scale : Gives a random minimum and maximum scale to the selected assets.
Add Remove leaves : Allows you to add or delete assets.
Alternating and random rotation : Allows you to adjust the orientation of the leaves on the branch
Inclinaison : Control the inclination in relation to the branch.
Offcet : Create an offset between the leaf and the normal branch.
Rotations : Allows you to adjust the local tilt of the assets in the case of a misaligned asset.
Align Z Global orients the assets on the global Z axis.
Leaves Precision Mode :
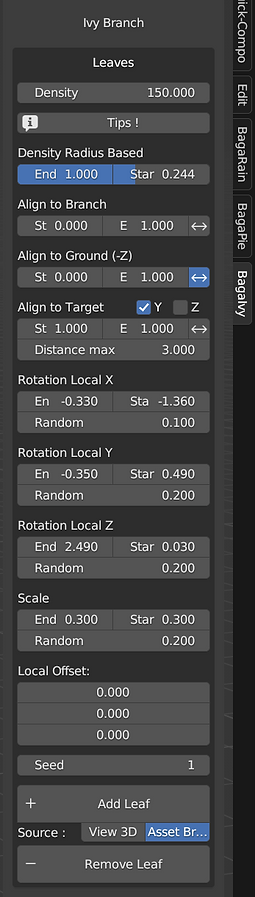
Leaves Density : Regulates the density of the foliage.
Density radius Based : Adjusts leaf density according to radius
Align to Branch : Aligns leaves with branch normal
Align to Ground : Z-axis sheet alignment
Align to Target : Aligns sheets on target surface
Rotation Local : Allows rotation on the local asset axis.
Scale : Adjusts the sheet scale according to the start and end of each branch
Local Offcet : Moves assets on a local axis
Add Remove Flower : Allows you to add or delete assets.


Flowers/Fruits

Draw extention
Effect : The Flowers menu allows you to modify the parameters of the flowers, this tab is similar to the Leaves tab.
Access : N panel (addon panel)
Notes :
_ To add or remove a flower asset you can follow the same procedure as for the leaves.
_ In the case of falling flowers such as wisteria it is necessary to orient the flowers on the global Z axis
_This menu is different from one mode to another
Flower Fast and Accurate mode :

Flower probability : Regulates the probability that a flower will appear.
Flower Random Scale : Gives a random minimum and maximum scale to the selected assets.
Add Remove Flower : Allows you to add or delete assets.
Offcet : Create an offset between the flower and the normal branch.
Rotation : Allows you to adjust the local tilt of the assets in the case of a misaligned asset.
Align Z Global orients the assets on the global Z axis.
Flower Precision Mode :

Flower probability : Regulates the probability that a flower will appear.
Align to Branch : Aligns leaves with branch normal
Align to Ground : Z-axis sheet alignment
Align to Target : Aligns sheets on target surface
Rotation Local : Allows rotation on the local asset axis.
Scale : Adjusts the sheet scale according to the start and end of each branch
Local Offcet : Moves assets on a local axis
Add Remove Flower : Allows you to add or delete assets.
Branch Profile & Shader
Branch Profile & Shader Panel :

Auto Radius : Merges branches together.
UV Scale : Adjust trunk texture
Material : Materials used for the trunk and branches.
Mapping : Gives a random minimum and maximum scale to the selected assets.
Color :
Allows you to adjust the color and brightness settings of the default material.
Effect : This menu allows you to set the trunk profile and shader more precisely than in Fast and Accurate modes.
Access : N panel (addon panel)
Notes :
_ The auto radius allows branches to merge together if there are enough of them, but also to adjust the radius of the trunk.
_This menu is only available in precision mode
Trunk
Effect : Allows you to set the diameter of the trunk and branches, but also the parameters and the choice of material.
Access : N panel (addon panel)
Note :
_ Warning ! In case you want to have your custom texture, it's better to use a node mapping and attribute and think about renaming UVs.
_ The parameters of the base material can be set directly in the Npanel. If you are using your custom texture you cannot use the Npanel settings, however it is possible to use the settings in the Shader Editor.
_ It is not possible to use a different material for the trunk and the branches.
_ This menu is only available in Fast and Accurate mode

Add a custom Materiel
Trunk panel :

Trunk : Allows you to adjust the diameter of the trunk and branches.
Material : Materials used for the trunk and branches.
Mapping : Gives a random minimum and maximum scale to the selected assets.
Color : Allows you to adjust the color and brightness settings of the default material.
To use your materials it is important to use a node mapping and attribute and remember to rename UVs

Effector
Effect : Effector is a function to define an object as pushing back the ivy.
This function can affect the foliage but also the branches.
This setting allows to control manually the propagation of ivy and to stop it precisely, in the case of a window frame or the start with the ground.
Access : N panel (addon panel)
Note :
_ To define an object as an effector, select the effector object > select ivy > click on + Add.
_ To delete, select the effector object > select ivy > click on - Remove.
Add Effector
Access : N panel (addon panel)
Effector panel :

Distance : Distance from the effector on the ivy
Affect branches : Allows you to affect the leaves or only the foliage
Distance Random : Create a random effect on the object defined as effector
Leaf Offcet : Create an offset between the foliage and the branches.
Add Remove : Allows to define or not an object as effector.
Animation
Effect : The animation menu allows you to set the animation of the foliage.
Access : N panel (addon panel) and Timeline panel
Note :
_ The Loop method allows you to generate an animation without interuptions, you just have to section the number of frames that the loop will last. This function is particularly used for rendering long animations.
_ Texture comentaire
Animation Loop panel :
Method : Allows you to choose between a Continue animation or a Loop animation.
Turbility : Accentuates the turbulence in the foliage
Loop every X frame : Duration of a loop in the case of a Loop method.
Speed : Animation speed
Animation Continue panel :

Infuence Texture : Accentuates the intensity of the animation according to the texture
Time Offset : Animation shift from one sheet to another
Intensity : Intensity of the animation
Random Intensity : Given a random intensity to each leaf


Animation parameters
Generation Method

Effect : The Generation Method menu allows access to advanced functions concerning the generation of ivy.
Access : N panel (addon panel)
Notes :
_ By default these functions are directly set, these settings are intended for the experienced user.
_ Snaping sets the distance at which the leaves are affected by the normal of the target face, this option is used in the case of a bridge to determine the distance at which the orientation of the leaves is free.
_ The decimate option can allow you to reduce the polucount of your scene. However, unlike the proxy, the decimate is not deactivated when rendering, so this option is reserved for an ivy in the background that does not require high quality.
Displacement effect
Generation Method panel :

Snapping : Distance at which the leaves are affected by the normal of the target face.
Displacement : Adds noise to ivy depending on the surface's normality.
Offset : Create an offset between the wall and the foliage and branches.
Decimate : Allows to reduce or increase the length of the segments which compose the trunk and the branches.
Visibility
Effect : The Visibility parameters allow to hide the foliage of the ivy or not. But also to create proxies to reduce the polycount of the scene and reduce the resource consumption of the computer.
Access : N panel (addon panel)
Note :
_If you want to use a lot of ivy, create several ivies and use a proxy for each one you don't use.
_ In Fast mode, trunks can be masked to improve performance.
Animation panel :

Use leaf : Displays the leaves.
Use Flower : Display the flowers.
Use Proxy : Generate a proxy on the whole ivy in the viewport.
Create Leaf Proxy : Generate a proxy for flowers and leaves in the viewport.
Visibility parameters
Source Object

Change collection from Source Object
Utilization : The Source Object menu allows to see the collections used for the generation of the ivy. A rotation system also allows to apply a rotation to all the assets used on the ivy. In case you use your own assets with a different orientation.
Access : N panel (addon panel)
Notes :
_ It is possible to select the collection of your choice to change all the flowers or flowers at once.
_ It is possible to use the switch button if you want to use only one asset rather than a collection.
Source Object panel :

Sources Object: Displays the selection where are stored the target object, the start point and the effector object.
End Branch instance : Displays the collection where are stored the assets of flowers used on the ivy.
Leaf Instances : Displays the collection where are stored the assets of leaves used on the ivy.
Leaf instance : Allows you to apply rotation to all the assets in the scene.
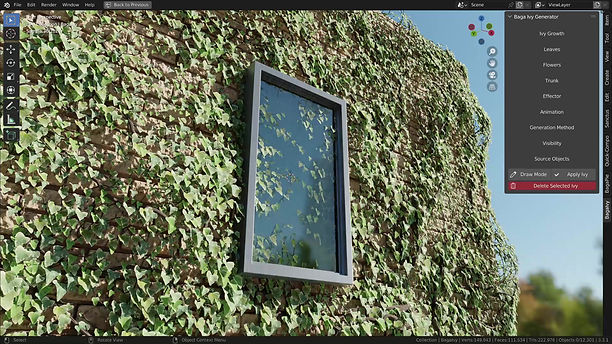
Delete an Apply Ivy
Utilization : The Draw, Apply and Delete Seleted Ivy modes are shortcuts that you can use from the N panel.
Access : N panel (addon panel)
Note :
_ Warning ! Apply Ivy transforms the ivy into a mesh, this function needs a lot of resources, use it on small ivy and remember to save your scene before using it.
_ If you use apply Ivy, the animations will not be preserved.
Draw mode is not the only way to add branches, you can also use the Tab key to switch to Edit Mode.
_ To delete branches, switch to Edit Mode and delete unwanted vertices.
Apply Ivy
Main panel :

Draw mode : Allows you to switch to edit mode and add or remove branches to the ivy.
Apply Ivy : Convert ivy to mesh
Replace Presets
Remplace presets
Utilization :You can select an another preset in the asset brower to renplace the current ivy.
Any changes to may have made to this ivy will not be saved.
Access : N panel (addon panel)
Notes :
_ It is possible to select the collection of your choice to change all the flowers or flowers at once.
_ It is possible to use the switch button if you want to use only one asset rather than a collection.
Source Object panel :

Remplace Presets : Allows you to replace the default preset with the settings of your choice